The 12 Best Email Ticketing Systems: Comparison Guide


If your team is having a hard time managing emails — losing track of requests and sending duplicate (and sometimes conflicting) replies — it's time to upgrade to an email ticketing system. Email ticketing systems help teams collaborate more effectively, keep track of requests more easily, and answer customer emails faster.
In this post, we're going to take a look at the 12 best email ticketing systems. We highlight which types of teams and use cases each system is best for and share some of their most unique features so you can find the perfect fit.
Overview of the best email ticketing systems
Get a quick summary of our picks for the best email ticketing systems below. If you want more information about any of these tools, we share our detailed reviews of each platform later in this article.
Help Scout is a user-friendly and affordable email ticketing system with powerful automation, collaboration, and organization features.
Gmelius is ideal for teams that want to manage team emails in a Gmail inbox, adding features like email assignments and analytics to the Gmail interface.
Salesforce Service Cloud offers a comprehensive suite of tools that are perfect for large and enterprise companies.
Freshdesk is a good choice for businesses looking for features like community forums and self-service portals.
Front is designed for professional services businesses that need to collaborate on customer communications across personal and team email addresses.
Jira Service Management excels at managing internal support requests and IT service management (ITSM) workflows.
Zendesk is a highly customizable and scalable platform for businesses with complex support needs. It offers a wide range of integrations and advanced features.
HubSpot Service Hub makes integration seamless for businesses that are already using HubSpot's marketing and sales tools.
Dixa is a good option for large support teams that want to set up sophisticated routing rules to ensure the right requests are going to the right people.
Zoho Desk is a strong choice for businesses looking to improve agent productivity with built-in time tracking.
JitBit is a great self-hosted email ticketing system that gives you access to modify its source code if needed.
ServiceNow is a powerful enterprise-level platform that is designed for large organizations with complex IT support needs.
What is an email ticketing system?
An email ticketing system is software that converts incoming emails into support tickets, making it easier for teams to track, prioritize, and resolve customer questions.
At their most basic, email ticketing systems display all email requests in a central shared inbox. However, more advanced systems can also display requests from other channels like live chat, social media, and phone.
How does an email ticketing system work?
Here is the the basic workflow for an email ticketing system:
When an email is received, it's converted into a unique, trackable ticket.
All tickets are displayed in a central inbox that everyone on a team can access.
Tickets can be manually or automatically assigned to individual team members.
All replies to the email (from your team and customers) are attached to the ticket.
Ticket statuses can be changed to show progress (blocked, in progress, closed, etc.)
Closed tickets are removed from the main inbox but are archived for future review.
Email ticketing systems also let you access reports on your team's performance, showing things like average response times, average resolution times, number of open tickets, and more.
Who uses email ticketing systems?
Here are a few ways that different teams use email ticketing systems:
Customer support: Support teams collaboratively manage and resolve customer requests, track emerging issues, and surface customer data for the broader company using ticketing tools.
IT: IT teams track and resolve technical issues reported within their organizations. They may also use a ticketing system for other purposes, such as the management of company property.
Finance: Finance teams use ticketing systems to handle incoming messages related to billing, payroll, and expense reimbursements.
Marketing: Marketers regularly email outside collaborators, such as content and design freelancers, PR firms, and industry partners. Ticketing systems help document those conversations.
Human resources: HR teams may use ticketing systems to manage employee or applicant communications surrounding hiring or benefits administration.
The benefits of using an email ticketing system
There are many advantages to switching to an email ticketing system:
Centralize all emails in one place: Rather than having emails scattered throughout individual mailboxes, email ticketing systems bring all of your emails into one location.
Organize and prioritize tickets: Once a ticket is created, you can assign it to a specific person, add tags to organize requests and track specific issues, and assign priorities.
Automate redundant tasks: Email ticketing systems can auto-assign incoming tickets to team members, let you create rules for what types of requests should be assigned to specific individuals/teams, and write draft replies to frequently asked questions.
Get context to provide better support: Agents can view prior tickets and information — like a customer’s order history or how long a client has been with your company — from within the ticket window.
Measure your team's performance: Most email ticketing systems come equipped with out-of-the-box reporting that shows statistics on ticket volume, team productivity, insight into trending issues, and data that can help identify areas for training and improvement.
Features to look for in an email ticketing system
The features you'll need from your email ticketing system will vary depending on how high your email volume is, what type of support you're providing, and how much you can afford to spend, but there are some basic features that every team should consider must-haves:
Automation: While you may not need generative AI to automatically respond to incoming emails for you, you'll at least want to look for basic automation features like round-robin assignments and rules for handling and prioritizing incoming emails to save time and get emails to the right person immediately.
Ticket management: Ticket management features help you organize your shared inbox and may include ticket statuses (mark tickets as blocked, closed, or in-progress), ticket prioritization (automatically surface high-priority tickets), and ticket tagging (add prominently displayed labels like "VIP customer" or "product bug").
Collaboration tools: In addition to displaying all emails in a central, shared inbox, ticketing systems have features that make it easy to collaborate on tickets. Look for internal notes that let teams communicate about tickets privately and @mentions to notify another team member that you need their help.
Productivity features: Saving time is one of the biggest benefits of using an email ticketing system. Look for tools that let you save replies to frequently asked questions, quickly insert links to help center articles into email replies, and search for previous responses to similar inquiries.
Pre-built and custom reports: Reports give you lots of insight into your team's operations. Look for options that show you when your volume is increasing to know when you need to expand your team, how satisfied customers are with the responses they're receiving, and how quickly you're resolving customer requests.
Integrations: The ability to connect your email system to other tools like your CRM or billing system lets you pull customer information in from those tools that can help you deliver personalized support more quickly.
Security features: It's pretty much guaranteed that your ticketing system will contain protected information about your customers, so you'll want to make sure to find a system with encryption and role-based access controls. Certain industries may also need features like HIPAA, GDPR, and SOC 2 compliance.
You may also want to look for features like customization to make the system work exactly the way you need it to and mobile apps if your team responds to inquiries when they're away from their computers.
The 12 best email ticketing systems
Think your team might benefit from using an email ticketing system to manage your incoming and outgoing emails? Here are 12 great options to consider.
1. Help Scout – Best email ticketing system for customer support teams
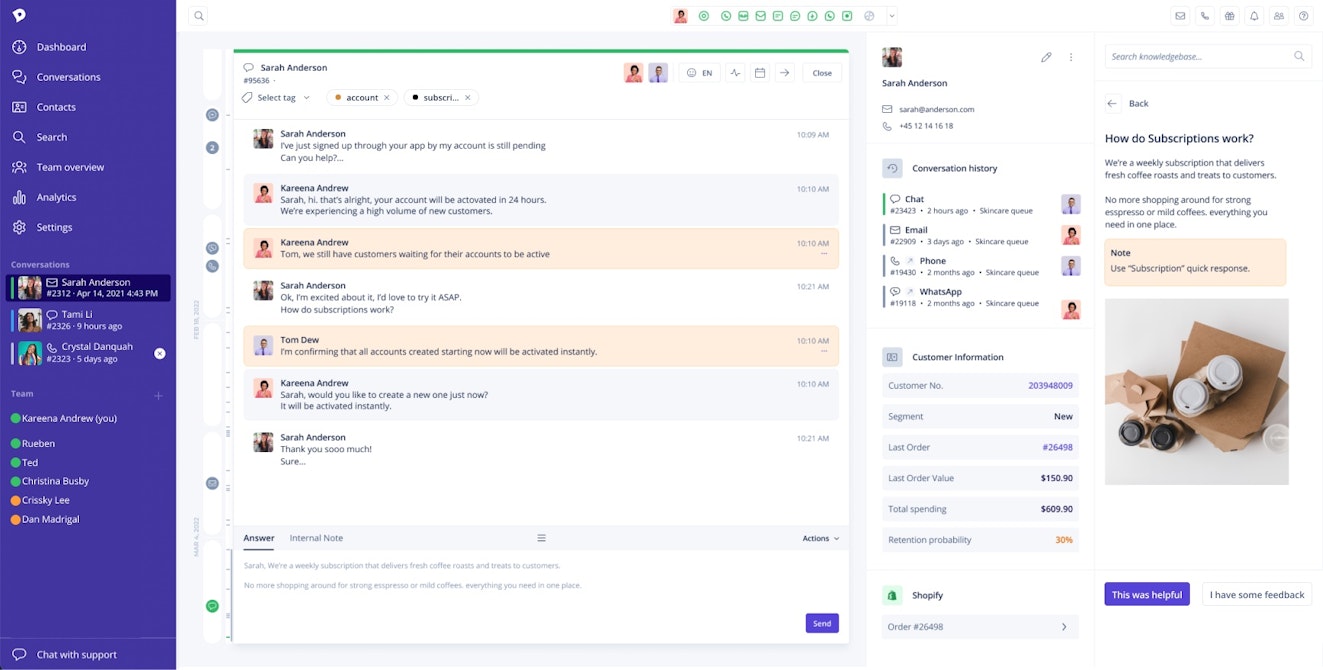
Help Scout takes the heavy lifting out of email management for customer support teams. Each email a team receives lands in their Help Scout inbox, which is accessible via web or mobile app.
Collaboration features
Within the shared inbox, team members can work collaboratively to respond to messages. If an employee or team is in charge of handling a specific type of request, those emails can be assigned to the right person for the job. Team members can also mention each other or leave private notes in the email thread, preventing forwarded email chains and keeping all information in one place.

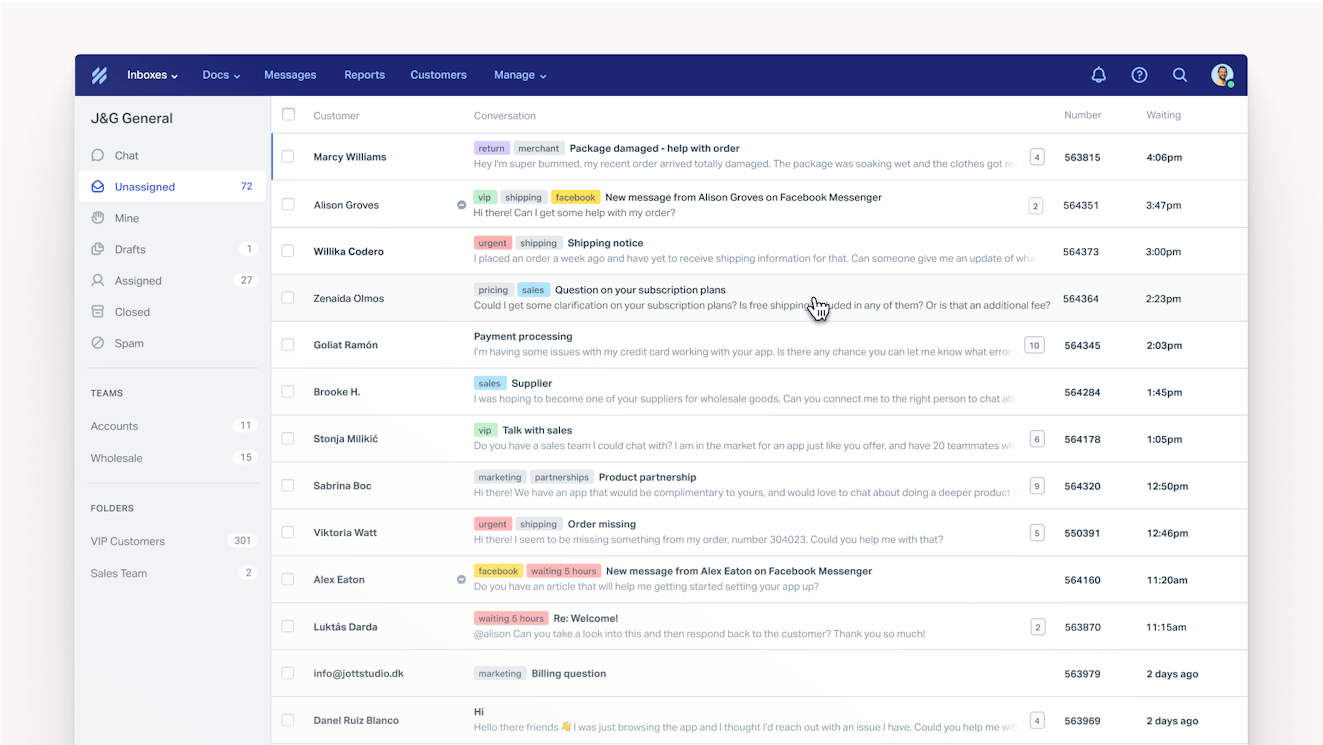
Help Scout also provides collision detection to ensure that each support team member knows who is working on which request. Visual cues such as team avatars and color-coded icons help prevent duplicate work and prevent miscommunications from reaching customers' inboxes.
Productivity features
Teams can increase productivity with saved replies — shared email templates that make it easy for your team to send out pre-written, standardized responses to FAQs. Familiar email functions like snooze and send later let you respond to customer conversations on your own time while still keeping your inbox clear. In addition, you can create workflows that reduce busy work like tagging conversations.


Automation features
AI features make it easier for your team to respond to conversations more quickly. AI Summarize can help get teammates up to speed on an issue by creating bulleted summaries of conversations. This can be handy during the escalation process or when reviewing interactions for quality assurance.
AI Assist helps polish your email replies and help center articles. The feature can shorten or lengthen text, adjust its tone to be friendlier or more professional, check for spelling and grammatical errors, and even translate the copy into another language.

AI Drafts uses information from previous customer conversations and your knowledge base articles to draft replies to incoming messages on demand. All you need to do is review the response for accuracy and hit send.
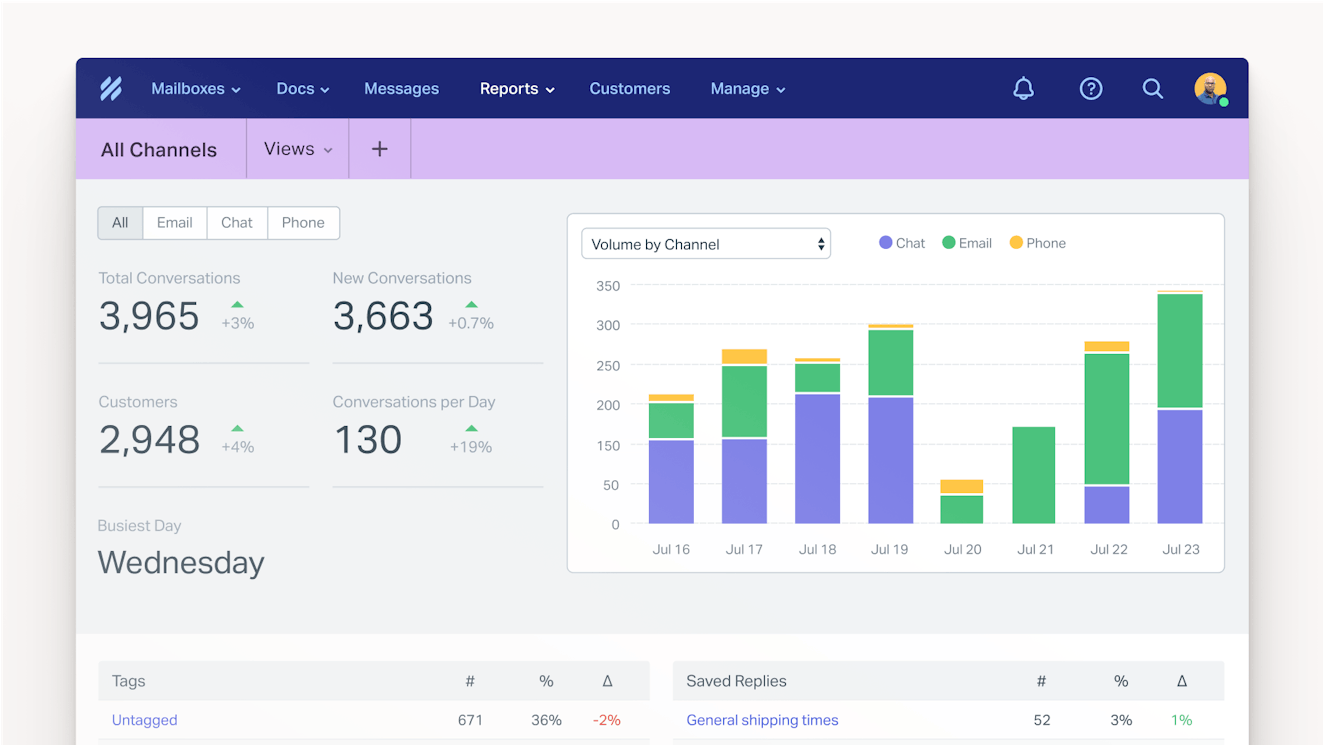
Reporting and integrations
Help Scout reporting dashboards let you analyze your teams’ productivity and other important performance metrics like customer satisfaction. Its integrations with other software apps like ecommerce platforms and CRMs help you track orders, view customer details, and see the bigger picture.
Multi-channel support
Beyond email, Help Scout also supports other communication channels like live chat and social media messaging, ensuring that you can be everywhere your customers need you to be. You can even use its AI chatbot to answer customer questions instantly.
Pricing
Free plan and trial available. View Help Scout's current pricing.
Learn more about Help Scout:
2. Gmelius – Best email ticketing system for small businesses

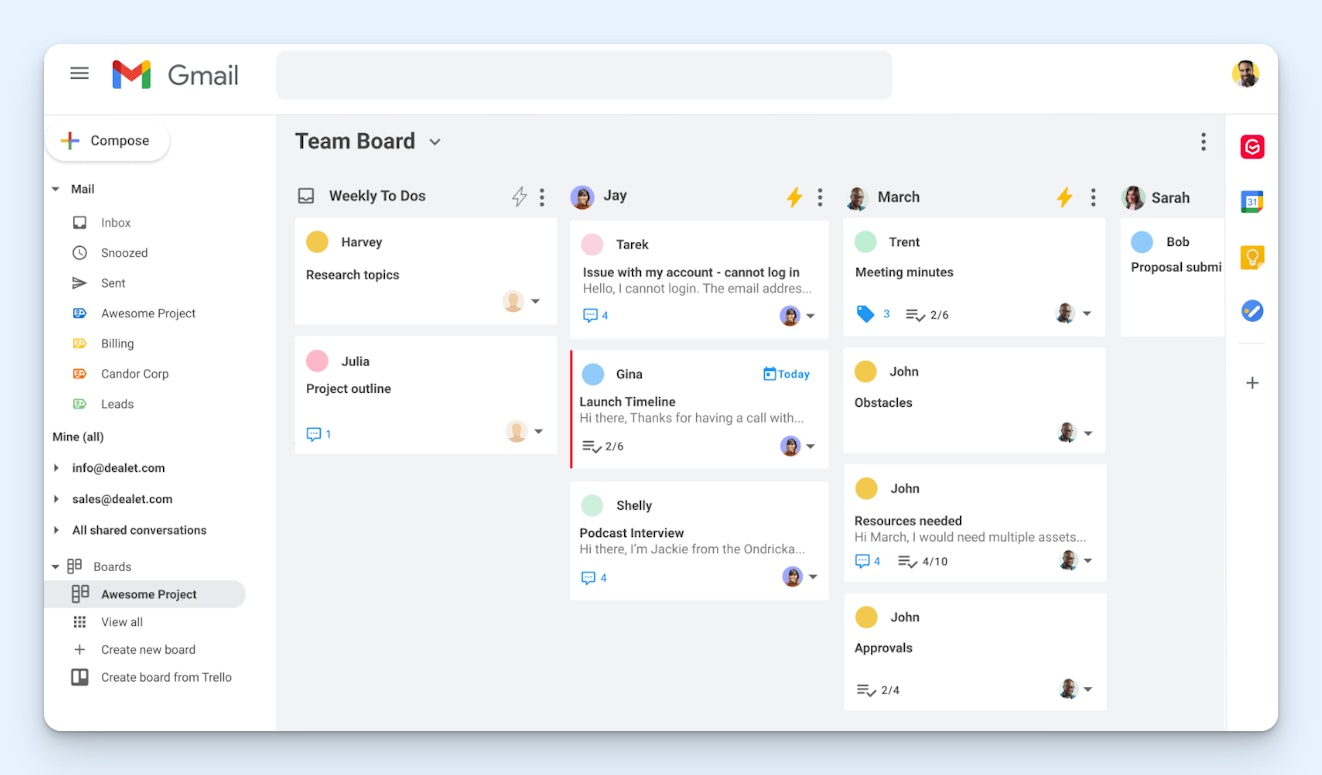
If your team relies on Gmail but is starting to find that Google products don’t quite cut it when managing email at scale, you might consider Gmelius — an email ticketing system built for use within Gmail. You can think of it as an extension that allows your team to view and collaboratively manage customer messages from within the native Gmail interface.
In addition to letting you create shared inboxes in Gmail, Gmelius also adds the ability to assign emails across your team (manually or automatically), use shared email templates, leave internal notes, tag conversations, create simple automations based on rules and criteria that you set, and handle basic tasks using AI.
One of Gmelius' most unique features is its ability to display your inbox as a Kanban board. You can create labels for things like open, pending, and closed requests, then drag and drop them into the right lane as your team works through the queue. This can be more helpful than viewing them in a traditional list where it's more difficult to determine the current status of all of the emails.
Pricing
Free plan and trial available. View Gmelius' current pricing.
3. Salesforce Service Cloud – Best for enterprise companies

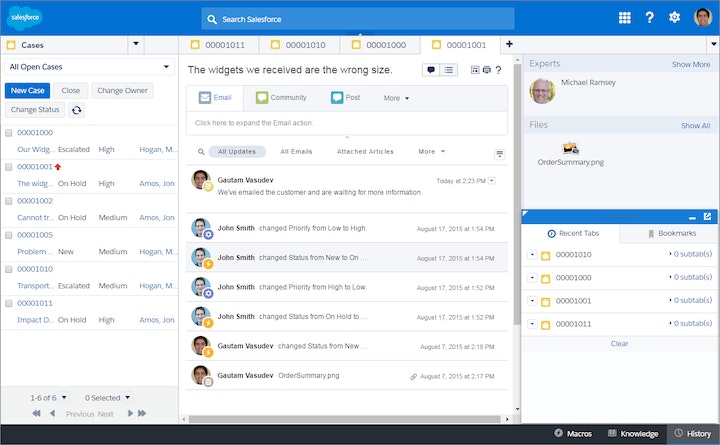
Salesforce is well known for its customer relations management (CRM) product, but it also offers several other customer-focused tools.
Salesforce Service Cloud is their ticketing system, catering to use cases such as customer service, field service, self-service, and employee service (HR teams, IT teams, etc.). Email management features include a shared inbox, ticket assignments, custom views, reporting, and cross-team collaboration tools. Service Cloud can also handle additional channels like live chat, voice, and chatbots powered by their AI technology, Einstein.
When it comes to cost, Service Cloud’s pricing page can be overwhelming. Add-ons and a seemingly endless table of features may make it hard to understand which plan your company needs. Still, the seamless integration and holistic customer view make Service Cloud a valuable tool if you’re already a Salesforce customer.
Pricing
Free trial available. View Salesforce Service Cloud's current pricing.
4. Freshdesk – Best free option for small teams with high ticket volumes


Freshdesk's free plan converts all emails and social contacts into tickets that are viewable in a shared inbox. Teams can assign tickets, use shared canned responses, leave private notes, and tag tickets. There is also basic reporting and a knowledge base builder available.
This base-level plan includes a limited number of agents and is a great place to start if your company only offers email support. The company’s paid plans are more robust and offer features like service level agreement (SLA) management and round-robin ticket routing. You can also customize your plan using add-ons for features like AI functionality.
One feature offered as part of the platform’s Pro plan is a community forum builder, which allows you to set up a message board for your users. While not email-related, having self-service features like a knowledge base and community forums can help get your customers answers faster than email alone.
Pricing
Free plan and trial available. View Freshdesk's current pricing.
Recommended Reading

5. Front – Best for personal and shared email management


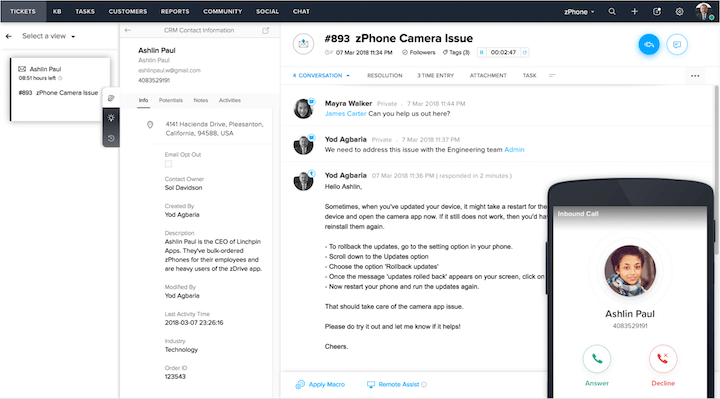
Front is a ticketing system that enables teams to manage just about any channel (email, social, SMS, live chat, etc.) through a shared inbox.
The tool boasts many collaborative features like email assignments, canned responses, shared drafts, and internal discussions. You can also utilize tags, set up automations, view reporting dashboards, and use AI technology to handle tasks like ticket summaries, writing assistance, and chatbot support for your site.
An interesting aspect of Front is its choice to integrate personal account access into the tool. For instance, you can view your personal inbox (e.g., john.smith@yourcompany.com) and your shared inboxes (support@, accounting@, sales@, etc.) all from within the Front user interface (UI). You can also integrate your calendar, making it easy to schedule meetings without leaving the tool.
Pricing
Free trial available. View Front's current pricing.
Recommended Reading

6. Jira Service Management – Best for small IT support teams

Jira Service Management is a platform that assists IT teams in managing service requests, incident and problem responses, asset control, and knowledge access.
The software has the standard features you would expect to find in a help desk system or service desk. Routing capabilities that make it easy to move tickets across multiple help desks, a low cost of entry, AI to help with routine tasks, tools for managing SLAs, and a recognizable UI make onboarding easy for most technical teams.
For those who need to integrate their ticketing system with internal communication channels, Service Management can push ticket notifications and activity to platforms like Slack and Microsoft Teams.
Jira Service Management offers a free plan that may appeal to smaller teams. However, potential customers should be aware that this plan only provides 2GB for storing files, lacks some functionality, and doesn’t come with support access beyond self-help in the Atlassian Community.
Pricing
Free plan and trial available. View Jira Service Management's current pricing.
7. Zendesk – Most customizable email ticketing system


Zendesk is a comprehensive platform supporting the management of email, live chat, phone, social media, and SMS as well as self-service channels like its knowledge base software, Zendesk Guide. The software includes shared mailbox functionality with collaborative features that are similar to other email ticketing tools, as well as more specialized features, including customer satisfaction surveys and its AI-powered virtual agent offering.
What separates Zendesk from the competition is its ability to be customized for any use case. You can integrate your Zendesk account nearly 2,000 different software products, creating a centralized hub for all your customer, client, or student data.
However, something to note is that most of these integrations and customizations are not plug-and-play solutions. Many require basic technical aptitude at a minimum or developer skills at most, meaning that smaller teams may need to hire a contractor to assist with deployment.
For those with the technical resources or budget needed for customization, Zendesk could be a great choice for those who need a flexible solution.
Pricing
Free trial available. View Zendesk's current pricing.
Recommended Reading

8. HubSpot Service Hub – Best for startups using other HubSpot products


HubSpot is a company that produces marketing, sales, and service software. While its service arm is less well known, Service Hub should be on your short list if you’re already using the company’s other products.
Service Hub offers a free plan that enables you to manage email from a shared inbox. Teams can assign support tickets to the right agents and ease the burden of repetitive responses by using email templates.
Leadership can view reporting dashboards to monitor performance results and make informed decisions. The free plan also allows you to connect with customers through live chat and Facebook Messenger, enabling your team to provide multichannel support.
While a free option is nice, prospective customers should know that many of the best features HubSpot offers (ticket routing, customer feedback surveys, a knowledge base builder, workflow automation to handle tasks like ticket assignment or managing ticket status, etc.) are only available on higher-tiered plans.
Pricing
Free plan and trial available. View HubSpot's current pricing.
Recommended Reading

9. Dixa – Best email ticketing system for automatic routing

Dixa’s approach to email is a little different than some of the others on this list. Instead of having all of your team’s emails moved into a shared inbox, Dixa automatically assigns each conversation to the employee who is best equipped to respond to the request.
The platform bases the routing on both priority and agent skill sets and ensures that your support staff will spend more time focused on customer responses and less time cherry-picking the email queue.
Dixa offers many of the same email features provided by other email ticket software on this list: customer timelines, internal comments, tagging, reports, etc. It can also natively offer support for phone calls, live chat, social messaging, and self-service support. For those interested in AI features, Dixa offers a chatbot, conversation summaries, and an agent-assist tool at an additional cost.
While Dixa is impressive, it may not be the best pick for teams only looking for an email management tool. Their $39/agent per month plan only covers the Dixa Messenger channel — those wanting email support will need to opt for their Growth plan, which starts at $89/agent per month with a seven seat minimum.
Pricing
No free trial offered. View Dixa's current pricing.
10. Zoho Desk – Best email ticketing system with sentiment analysis

Zoho is a company that offers several products geared toward helping businesses do their best work. One of them, Zoho Desk, is a ticketing system that can help teams manage email and other popular channels like social and chat.
The platform has traditional ticket management and reporting features as well as more advanced tools like its AI offering, Zia. Zia has many useful tools, such as a chatbot, automatic ticket tagging, and basic reply drafting.
Zoho’s AI features also include sentiment analysis, which can mark a case as positive, negative, or neutral and tag any problems that may have led to a negative rating. This helps your team have the context needed to turn negative customer experiences around.
Pricing
Free plan and trial available. View Zoho Desk's current pricing.
Recommended Reading

11. Jitbit – Best self-hosted email ticketing system


Jitbit has all of the features needed to manage customer emails, such as a shared inbox, email assignments, agent collision alerts, canned responses, AI-generated responses, tagging, reporting, and a knowledge base builder. In addition, its simple UI and asset management feature makes it an excellent choice for IT service desks.
For teams on the go, Jitbit help desk offers mobile apps that let you respond to user and customer queries from anywhere via your iOS or Android device.
One aspect of Jitbit that sets it apart is that it offers two options for accessing its platform — hosted as a software as a service (SaaS) product or self-hosted, meaning your team can download and run the software on your own servers.
While most teams will prefer the ease of using a web-based, hosted product, companies that manage sensitive information and want complete control over their data may choose to keep their ticketing system in-house for increased security and safety.
Pricing
No free trial offered for self-hosted plans. View JitBit's current pricing.
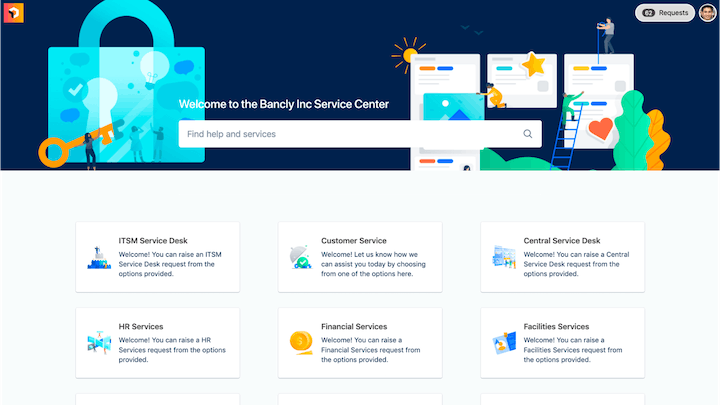
12. ServiceNow – Best email ticketing system for enterprise IT support teams

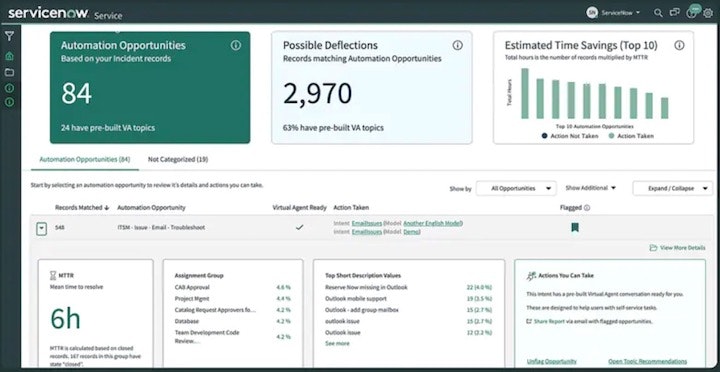
ServiceNow is one of the hottest information technology service management (ITSM) tools currently on the market. Targeting the enterprise-level user, ServiceNow has an impressive list of features ranging from standard email ticketing tools to asset and cost tracking to an online employee center that provides a central place for staff to access services quickly.
ServiceNow is a powerful system with features that smaller groups may not require, such as vendor management or dynamic translation functionality. While it’s unnecessary to use every feature available in a tool, extra features tend to raise plan pricing, and paying for things you’ll never use isn’t ideal.
Pricing
No free trial offered. Contact ServiceNow for pricing.
How to choose the right email ticketing system for your team
Every team has different needs. Some need simple tools to manage a high volume of emails. Others need powerful features like automation, reporting, or multi-channel support. The best email ticketing system for your team is the one that fits your workflows, scales with your growth, and doesn’t add unnecessary complexity.
Start by identifying your top priorities — whether that’s faster response times, better collaboration, or visibility into performance — then test a few systems that match. Most tools on this list offer free plans or trials, so you can get hands-on with the products you're considering before making a commitment.
If you’re running a lean support operation and want something intuitive, tools like Help Scout or Gmelius might check all the boxes. Larger organizations with complex workflows may lean toward platforms like Zendesk or Salesforce Service Cloud for their depth and customization. IT teams may benefit from Jira Service Management, while startups already using HubSpot might find Service Hub the easiest to implement.
With the right system in place, you’ll spend less time firefighting inbox chaos and more time delivering quality support.
Alexa Ahrens
Alexa is a content strategist at Help Scout, where she writes and helps other authors tell stories about customer experience, technology, and company culture. Before working in support and content creation, she worked at a wax museum — an experience that prepared her surprisingly well for a life of storytelling. Connect with her on LinkedIn.
Jessica Greene
Jessica Greene is a Help Scout alum, where we make excellent customer service achievable for companies of all sizes. Connect with her on LinkedIn or through her website.