The 31 Best Help Desk Software for Every Use Case & Budget


When it comes to managing support interactions, help desk software is an indispensable tool. In this guide, we’ll explore the different types of help desk tools, explain who they’re best suited for, provide a list of the 31 best help desk software for different types of teams and use cases, and share some guidance on how to make the right choice for your team.
At Help Scout, we only publish deeply researched, human-written content. If you find our content to be as helpful as we strive to make it be, you can set us as a preferred source in Google so you'll see our content surfaced more often when you're searching.
The different types of help desk software
The ideal type of help desk software for your team will depend on who your customers are, how you want your data to be hosted, and what level of control you want to have in customizing your help desk.
Customer service help desk software is designed for teams that support external customers (i.e., your employer's customers).
IT help desk software is designed for teams that provide technical support to either coworkers (in the case of IT support) or external customers (in the case of managed service providers).
Internal help desk software is designed for teams that support coworkers (e.g., HR, IT support, finance, maintenance and facilities, legal, etc.).
AI help desk software may fit into any of the other categories, but it's more focused on automating support operations than other types of support tools.
Open-source help desk software can be customized with code (by your team or other individuals/companies who also use the software) to add new features and functionality, as opposed to closed-source software which can only be updated by the company that produces it.
Cloud-based help desk software is designed for teams that want to have their help desk hosted by the software provider.
Self-hosted help desk software is designed for teams that want to host their help desk locally and manage its data on their own servers.
Below, we've split our recommendations into these categories and more to help you find the right options to consider. Note that most help desk software is both cloud-hosted and closed-source, and that will be the case for all of the tools we recommend unless we explicitly specify that the software is open-source or can be self-hosted.
The best customer service help desk software
Customer service help desk software lets teams organize requests from multiple channels (such as email, chat, social, phone, and SMS) into a single queue and gives you lots of tools for managing those requests more collaboratively, efficiently, and effectively so you can focus on providing great support to customers.
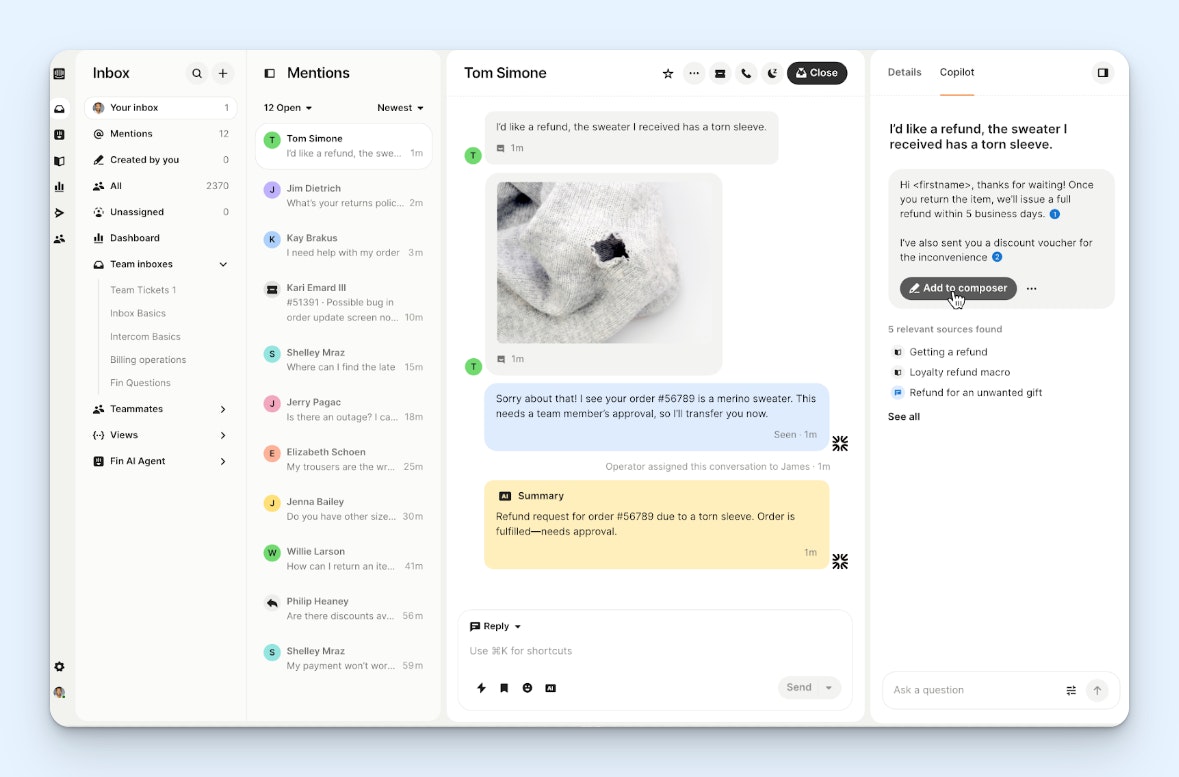
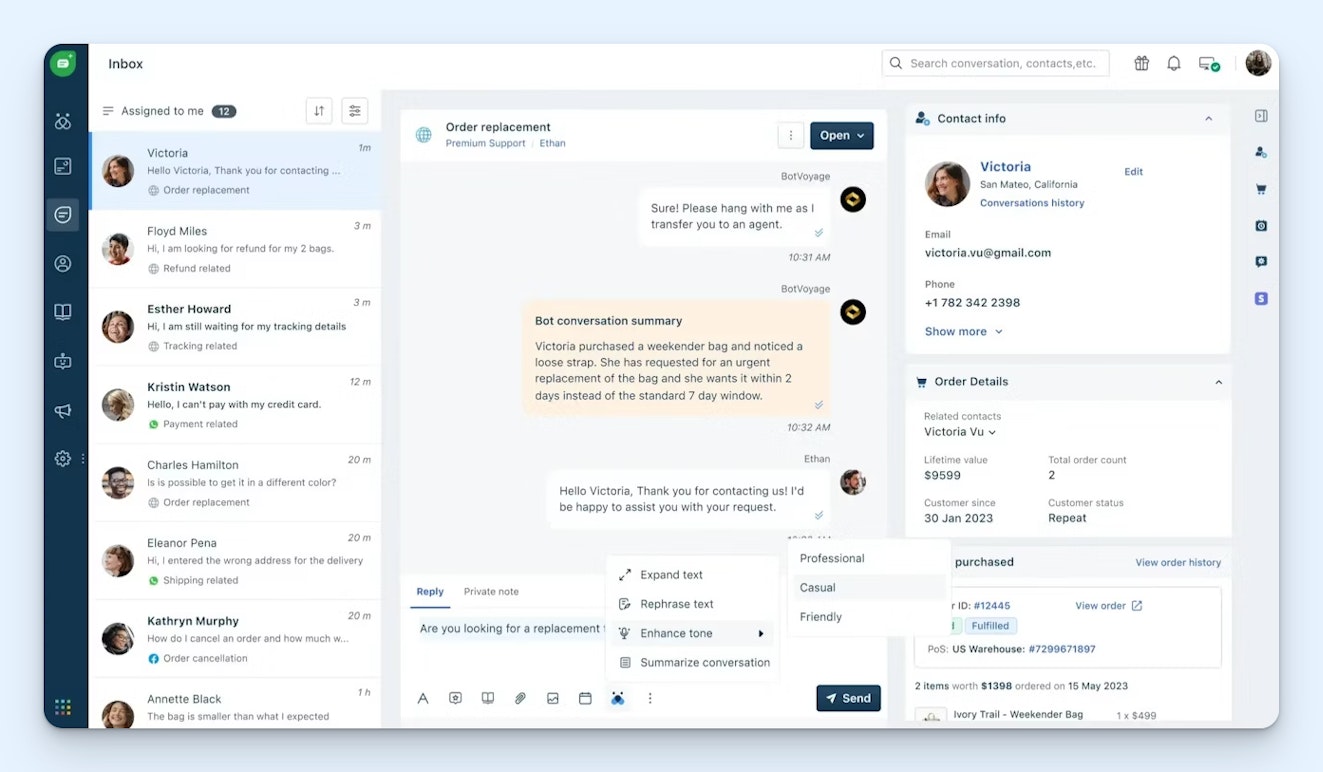
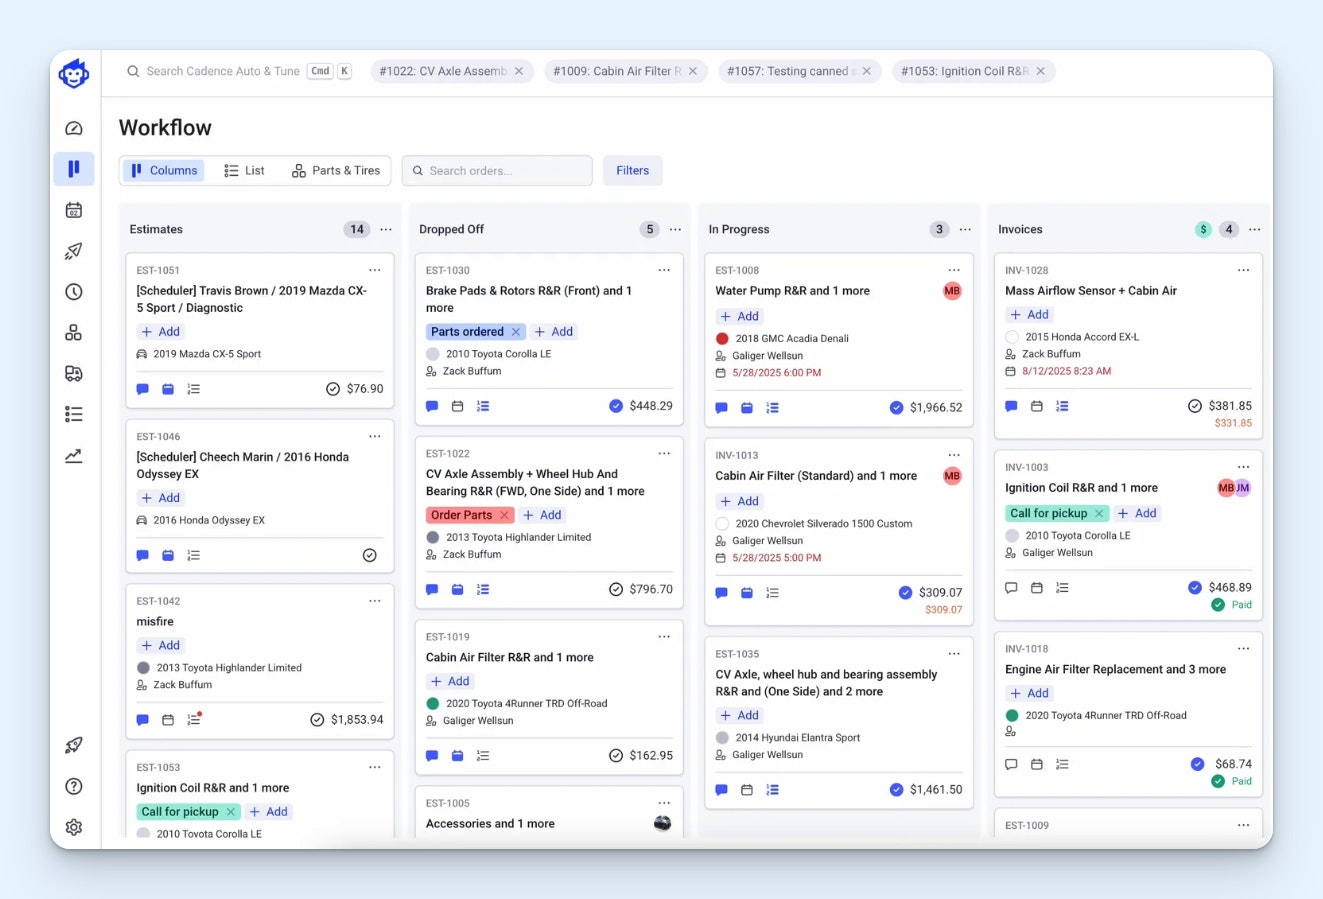
1. Help Scout – Best for extensive features at an affordable price

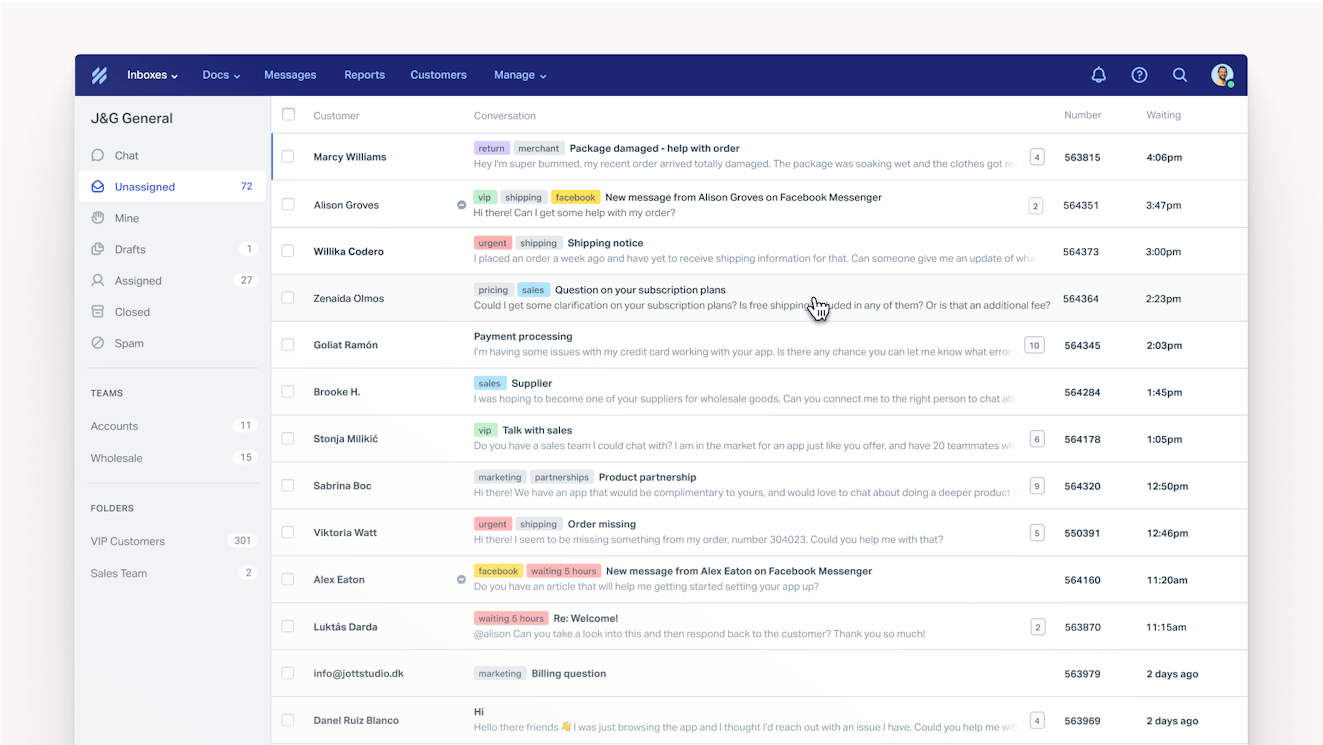
Help Scout is one of the most affordable customer service help desks on the market given its powerful feature set. Teams can use it to deliver support via email, live chat, and social. Build a help center for customer self-service, then launch an AI chatbot that's trained on it to answer customers' questions instantly. Plus, use features like saved replies and AI copilots to deliver excellent support faster than ever.
Price: Free plan available for up to five users. Paid plans start at $25/user per month for up to 25 users.
Learn more about Help Scout:
2. eDesk – Best ecommerce help desk software

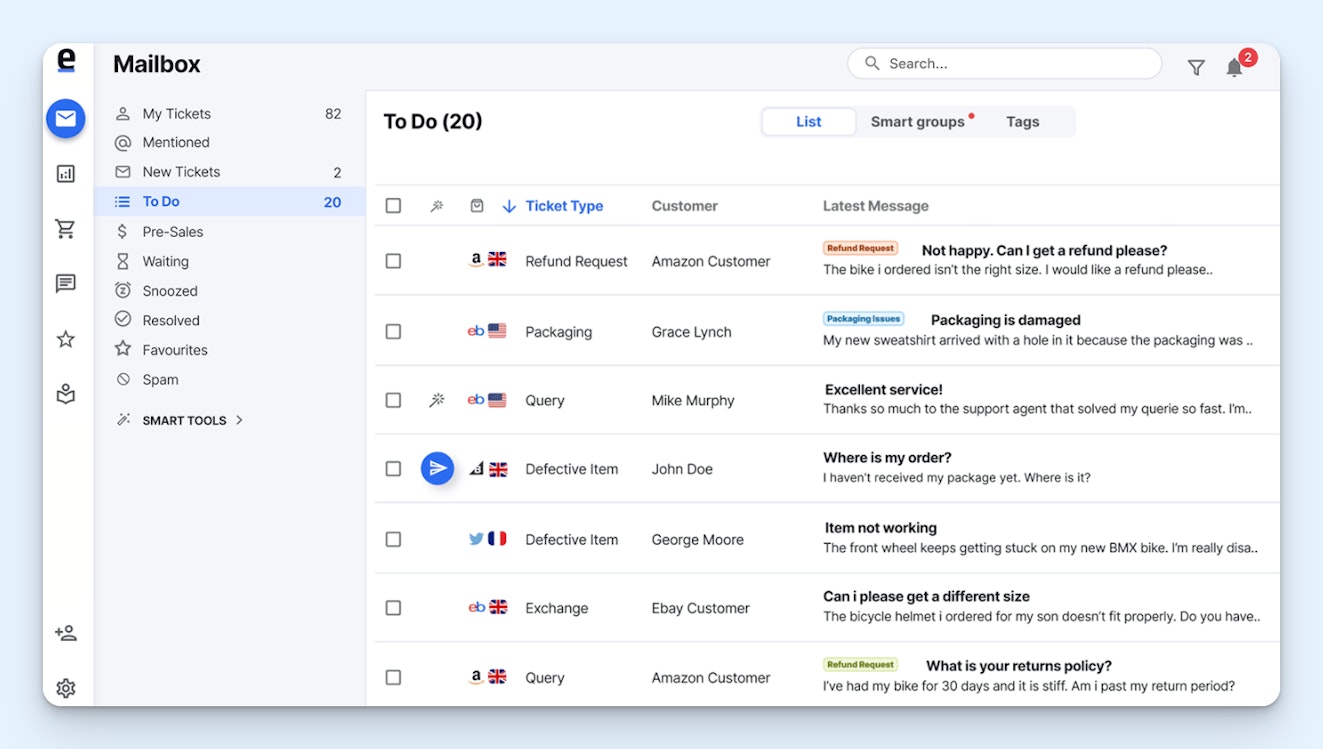
Built specifically for ecommerce teams, eDesk integrates with all of the systems your shop uses to deliver great support. See order details with its Shopify, Magento, BigCommerce, and WooCommerce integrations, and pull in messages from marketplaces like eBay, Amazon, Walmart, and TikTok Shop — and social platforms like Facebook, Instagram, and WhatsApp — to see everything in a single queue.
Price: Plans start at $39/agent per month.
Recommended Reading

3. Aircall – Best call center help desk software


Aircall is designed for teams that provide most or all of their customer support via phone and SMS. Create local, toll-free, and international numbers in the system, send customers to voicemail when no one is available to answer them, and build an IVR system to get customers to the right agent. Agents can use AI to get help answering customer questions, and managers can use it to identify coaching opportunities.
Price: Plans start at $30/license per month with a minimum of three licenses required.
If you also get support requests through channels other than phone and SMS, Aircall integrates with help desks like Help Scout, eDesk, Zendesk, Intercom, and more.
4. Zendesk – Best customizable help desk software


Zendesk is a robust help desk that lets teams manage requests from all channels and build community forums, customer portals, and help centers. It does everything you could ever want a help desk to do, and the platform is infinitely customizable. Create your own apps that appear in the sidebar, integrate with nearly 2,000 other tools, and use data from any system to which you've connected to create detailed reports.
Price: Plans that include customization features start at $115/agent per month.
Recommended Reading

5. Dynamics365 Customer Service – Best enterprise help desk software


Microsoft Dynamics365 Customer Service is great for enterprise companies, particularly those that are already using other tools in the Microsoft ecosystem. It has enterprise-level security, its AI features are powered by Microsoft Copilot, and it integrates with other enterprise-focused tools like SAP and Oracle. You can even launch a chat in Teams directly from the help desk to collaborate with a group of experts.
Price: Plans start at $50/user per month.
The best IT help desk software
Like customer service help desk software, IT help desk software also consolidates requests from multiple channels into a single queue. However, it comes with more IT-specific features like asset management, remote desktop control, change and incident management, and software provisioning.
6. Jira Service Management – Best ITSM help desk software

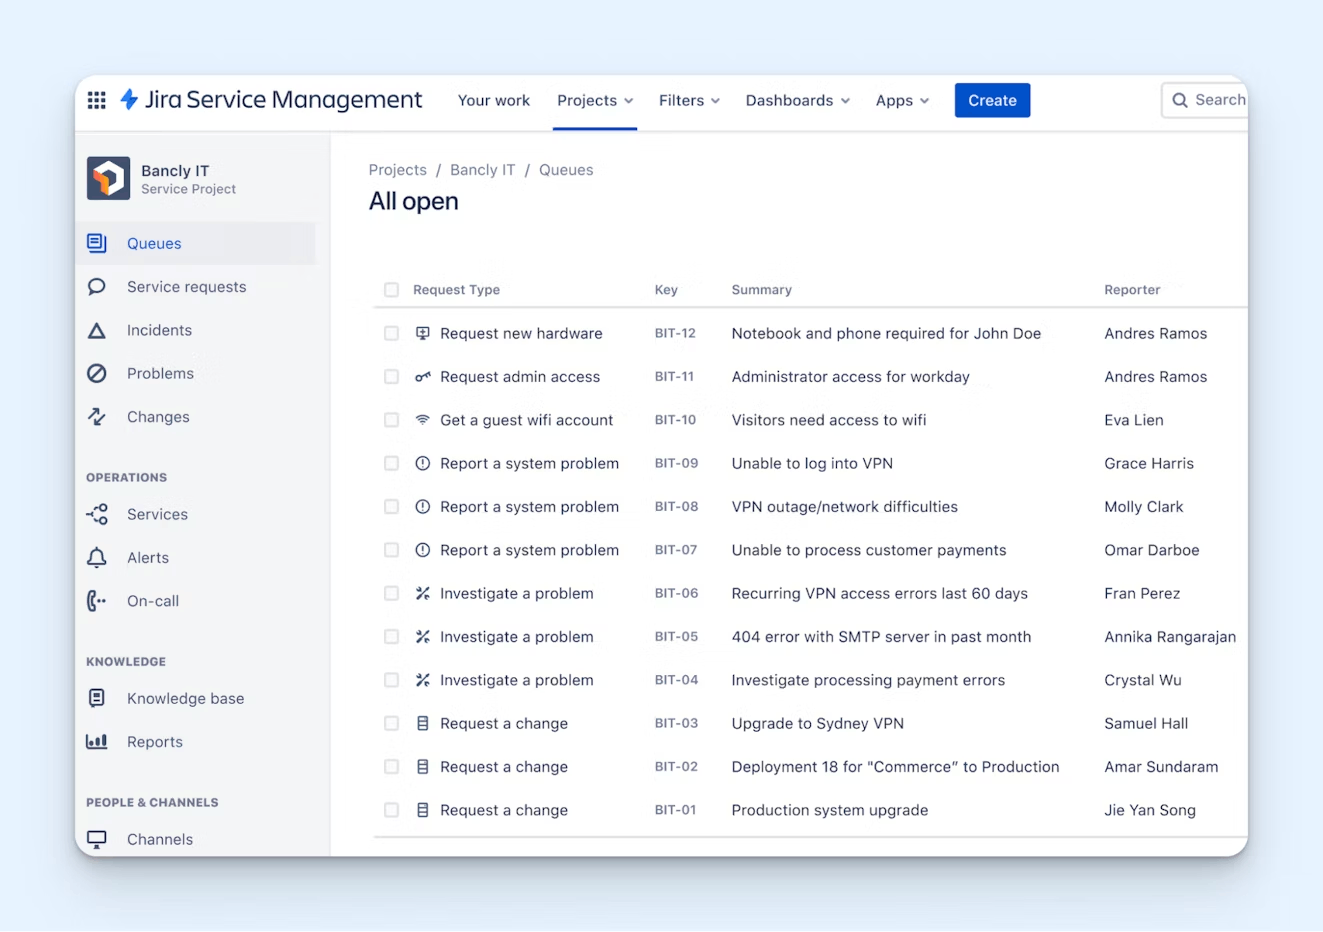
Jira is packed with all of the features that IT teams need. You can create a service desk, use AI to provide automated answers, configure SLAs, and manage your company assets. You can also code your own intake forms and automated workflows or access libraries of hundreds of pre-built, no-code templates. Plus, there are features for incident and change management, dependency tracking, and bug grouping.
Price: Free plan available for up to three agents. Paid plans start at $25/agent per month but can be lower based on the number of agents that you add to the platform (e.g., for 75 agents, plans start at $20/agent per month).
7. LogMeIn Resolve – Best remote help desk software


With LogMeIn Resolve, you get help desk features like a ticketing system and knowledge base, but you can also use its remote access tools to access Mac, Windows, iOS, Android, and ChromeOS devices. On Mac and Windows, you can even access unattended devices to deploy updates or fix issues while your coworkers are offline. Asset management is also available for managing inventory, licences, and usage.
Price: Plans for internal IT support teams start at $23/month. Plans for MSPs start at $25/month.
8. Datto Autotask and RMM – Best help desk and asset management software for MSPs


Datto offers both help desk software (Autotask) and asset management software (RMM), and the two platforms work together seamlessly to give you access to all of the features you need. Both tools are designed specifically for MSPs, so they're highly customizable, and detailed financial reports are available to show things like which clients you're losing money on and which techs are earning the most money.
Price: Contact Datto for pricing.
The best internal help desk software
Internal help desk software creates organization and workflows for teams who support their coworkers. It often integrates with the systems coworkers use most often (such as Slack or Microsoft Teams) to get all requests into a central queue and dissuade random pings that are hard to keep track of.
9. Suptask – Best HR help desk software

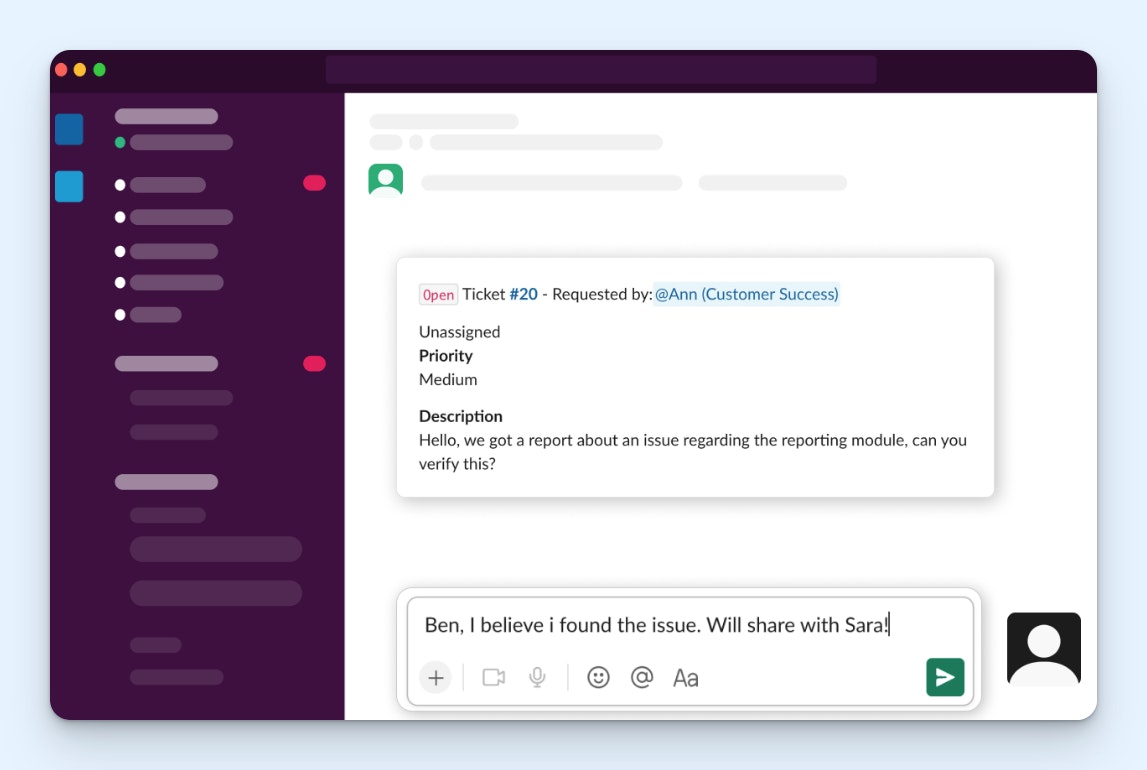
Suptask is a ticketing system that works entirely in Slack, making it a great choice for HR teams that are already getting all of their requests as Slack messages. Your coworkers create requests by @mentioning Suptask, those requests are consolidated into a list for you to manage, you get access to reports showing ticket volumes, and you can use AI to create summaries of tickets or route them to the right person.
Price: Free plan available. Paid plans start at $7/agent per month.
10. Siit – Best for consolidating internal support operations


Instead of having one help desk for IT support, one for HR, one for finance, etc., Siit lets all of your teams that provide internal support work out of the same platform. It integrates with the tools each of those teams use — Slack, Teams, Okta, Rippling, GitHub, and more — to unify your data across the organization and power its AI agents that answer questions, take actions to resolve issues, and route requests.
Price: Plans start at $23/admin per month.
11. HaloITSM – Best help desk software for facilities and maintenance teams


HaloITSM comes with all of the features that facilities and maintenance teams need. There's a portal where customers can make requests, an asset management feature that works via barcode scanning, and a resource booking feature to book rooms, equipment, vehicles, or parking spaces. You can also schedule tasks for your team in the platform to turn new requests into an action plan for completing them.
Price: Contact HaloITSM for pricing.
The best AI help desk software
AI help desk software can be used by customer, IT, or internal support teams. It often has many of the same features as general help desk software (multi-channel support, knowledge bases, collaboration tools, etc.), but it also offers a variety of tools that let you automate entire portions of your work.
Recommended Reading

12. Intercom – Best AI help desk for customer support
Intercom is a customer support help desk that works across all support channels and comes with a wide variety of AI features. You can use AI to answer questions automatically via email, chat, WhatsApp, SMS, phone, and Slack; update data in third-party platforms in order to resolve requests; add CSAT scores to all interactions; and get insights on what's going well for your team and where there's opportunity to improve.
Price: Help desk plans start at $29/seat per month. Most AI features have additional pricing, billed either as per-resolution costs or charged as per-user add-ons.
Recommended Reading

13. SysAid – Best AI help desk for IT support

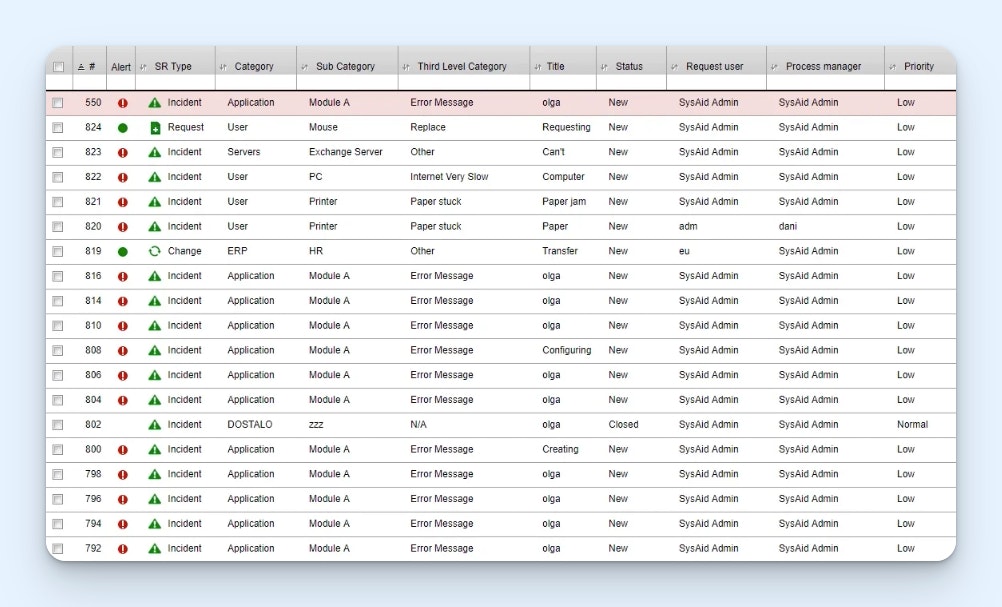
SysAid is an IT-focused help desk with several customizable AI features. Use its out-of-the-box agents to automate tasks for your team, or build your own agents using a no-code builder to dictate more specific workflows you want it to handle. There are also copilots for both agents and customers that help people find information and solve problems, and you have full control over what AI can access and do.
Price: Contact SysAid for pricing.
14. Monday Service – Best AI help desk for internal support


Monday Service is great for internal support teams (HR, finance, operations, etc.) who want to automate some of their work. There's an AI agent that answers routine questions for you, auto-categorization that sorts tasks by type and urgency, smart routing to get requests to the right person, smart suggestions that help your team figure out what to do with a request, and a workflow builder for creating automation flows.
Price: Plans start at $31/seat per month with a minimum of three seats.
The best help desk software for small businesses
The help desks we've listed below are all simple to use and affordable enough to accommodate small business budgets. We also feature a couple of options for tools that fit inside your existing workflows to make it easier to onboard the new software to your team.
Recommended Reading

15. Gmelius – Best help desk software for Gmail

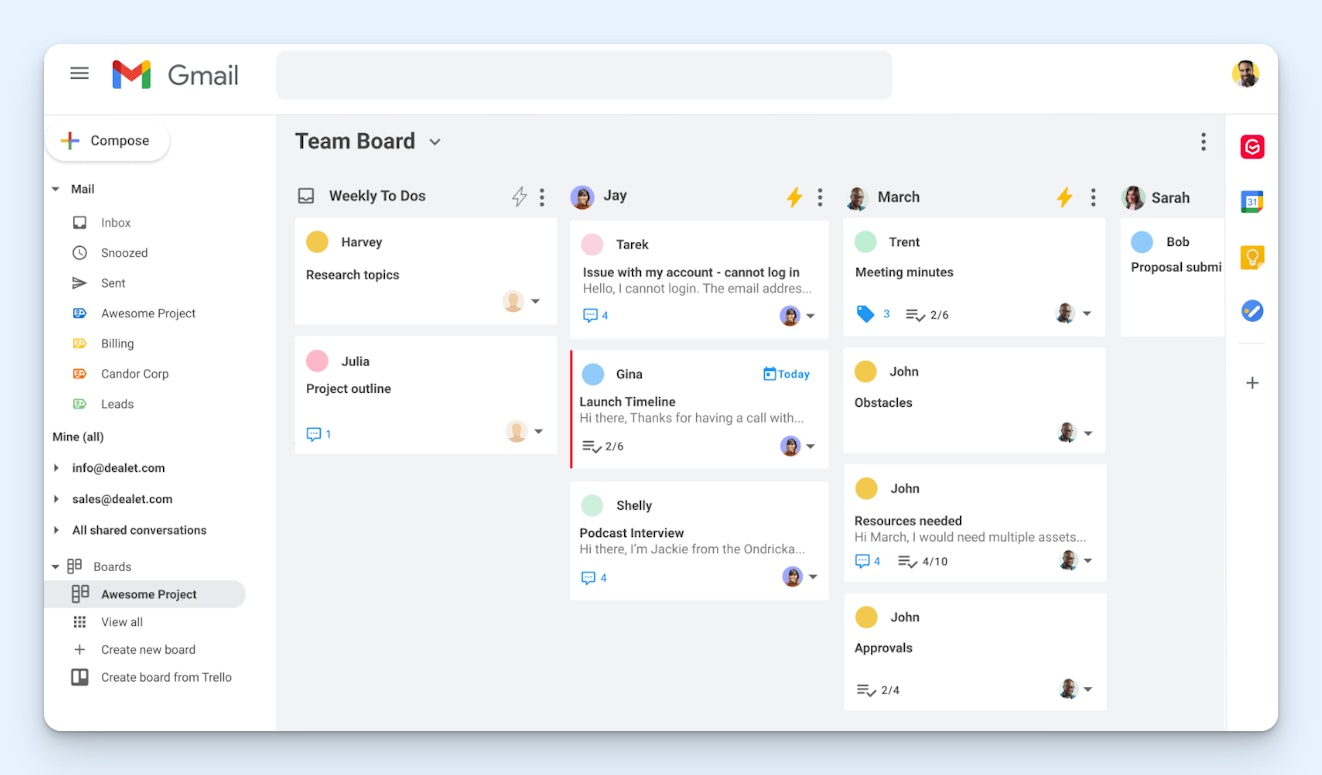
Gmelius turns your shared Gmail inbox into a full-fledged help desk, adding features like comments and @mentions for simpler collaboration, auto-responses for letting customers know their requests were received, collision detection to prevent duplicate replies, and — most importantly — reporting so you can see what your busiest times are, how satisfied your customers are, and if you're meeting your SLAs.
Price: Plans start at $19/user per month.
Recommended Reading

16. Emailgistics – Best help desk software for Outlook

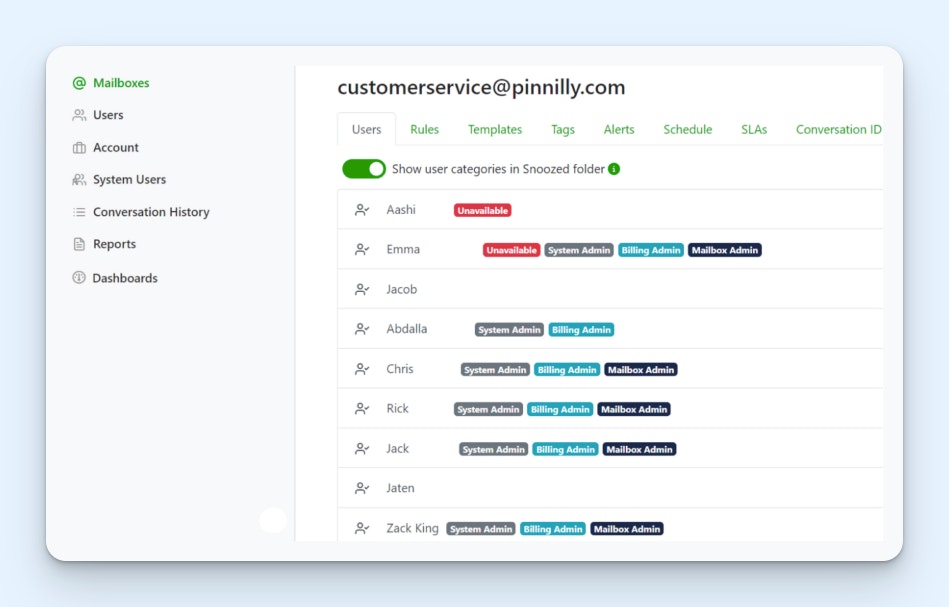
Emailgistics works on top of your Outlook shared mailbox, adding features like assignments, reporting, internal notes, conversation histories, response templates, and team scheduling. Incoming emails are automatically routed to team members using a round-robin approach, and you can set limits on how many emails a person can be assigned. All assigned emails appear in a folder for each individual on your team.
Price: Plans start at $11/user per month.
Recommended Reading

17. Freshdesk – Best email-based help desk software

Freshdesk is Freshworks' email-based help desk platform. You can use it to manage email requests and build a knowledge base. It's an affordable option for small businesses and offers a lot of different ways to scale as you grow. For example, you can subscribe to Freshchat or Freshcaller later if you want to add chat or phone support, or you can upgrade to Freshdesk Omni to get access to all support channels.
Price: Free plan available. Paid plans start at $19/agent per month.
Recommended Reading

The best open-source and self-hosted help desk software
If you have a more technical team, open-source software means you'll never again have to submit a feature request to a provider and cross your fingers in hopes that they'll build it. Instead, you can build the features you want yourself. The options below can also all be self-hosted for better control of your data, though cloud hosting is also available if you prefer.
Recommended Reading

18. Zammad – Best open-source help desk for customer support

A lot of open-source tools are fairly bare bones in terms of features; you get the skeleton and build on what you need. Zammad is different. It can be as simple as you want it to be or as complex as you need it to be. It consolidates requests from all of the channels through which you offer support, there are tons of features to extend its functionality, and the platform can be cloud- or self-hosted.
Price: Free to download the code from GitHub. Zammad lists its pricing in euros; paid plans are available for a supported self-hosted version (starting at €2,999/year) and a cloud-hosted version (starting at €5/agent per month).
19. GLPI – Best open-source help desk for IT support

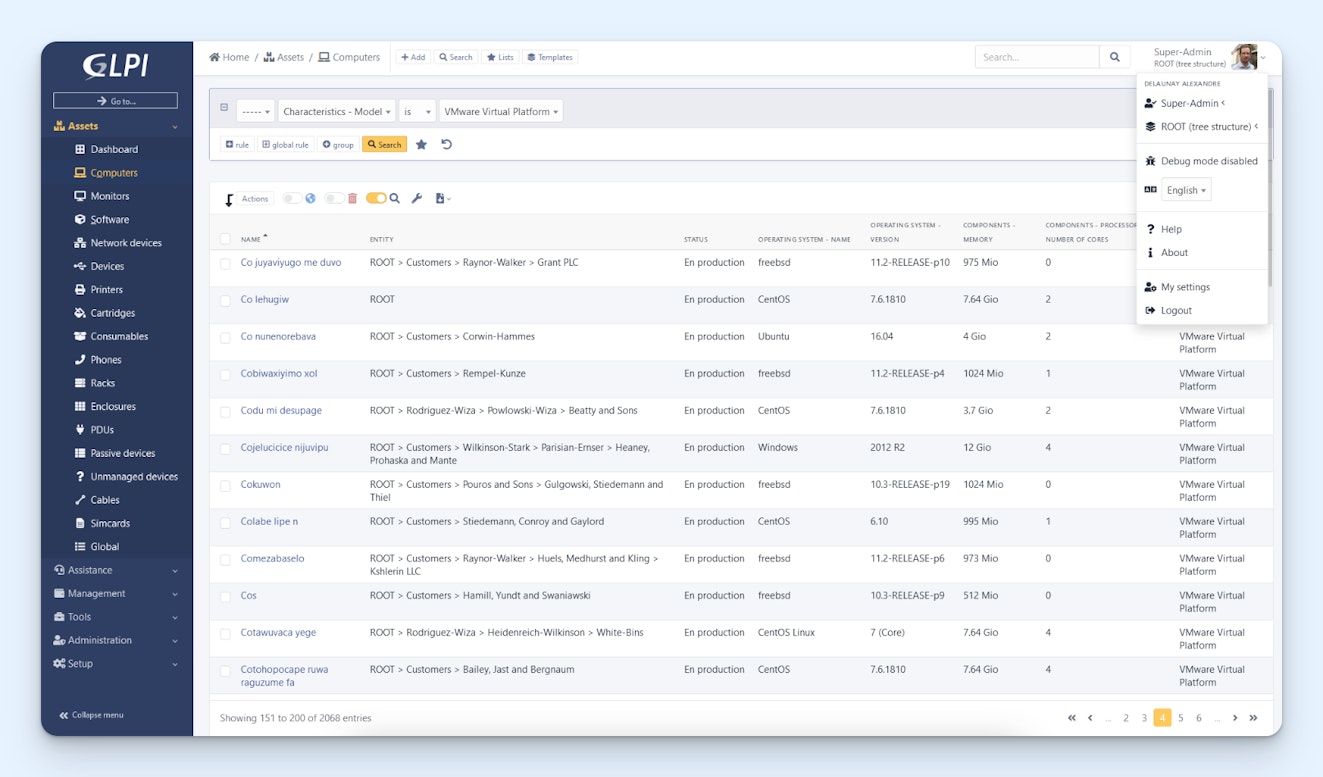
GLPI is an open source help desk built for IT teams. It comes with a service desk for handling tickets and incidents, asset and inventory management tools, and a financial management feature where you can manage all of your suppliers and licenses. You can also manage user permissions at a granular level and take advantage of LDAP, SCIM, and single sign-on technologies to authenticate users at login.
Price: Free to download the code from GitHub. GLPI lists its pricing in euros; paid plans are available for a supported self-hosted version (starting at €100/month) and a cloud-hosted version (starting at €19/agent per month).
20. UVdesk – Best open-source help desk for ecommerce companies

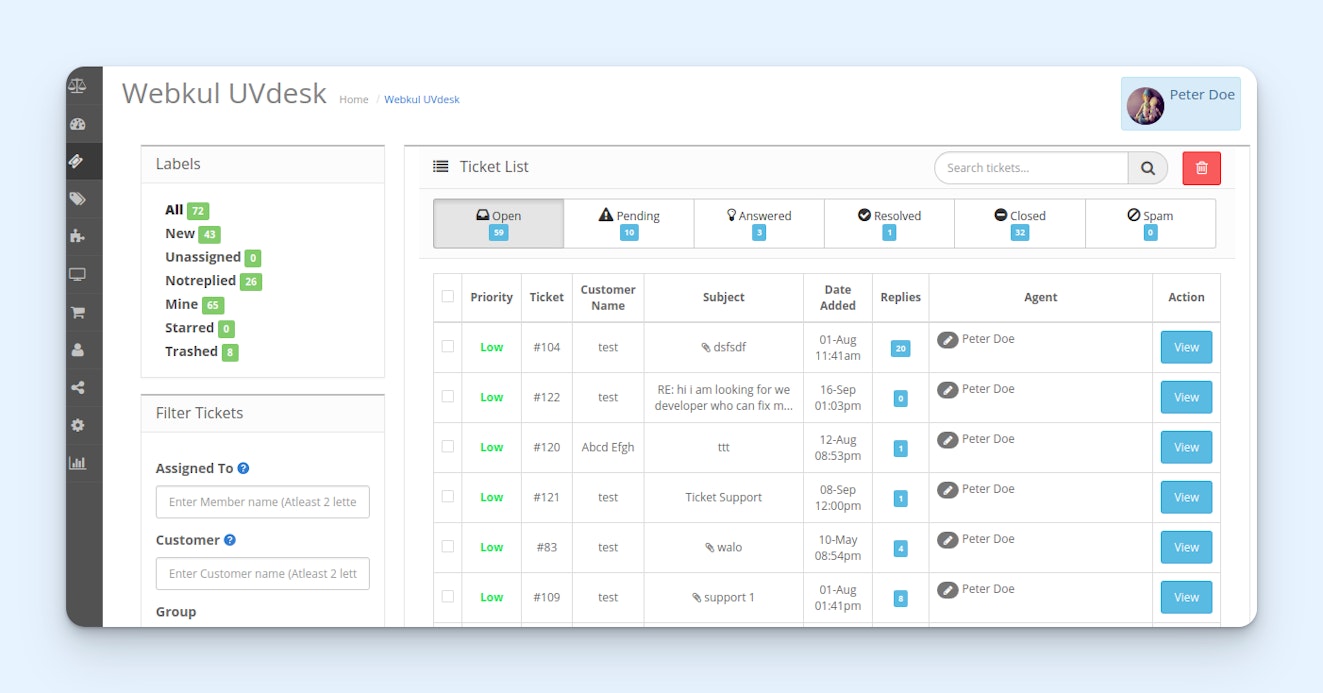
UVdesk is an open-source help desk targeted to ecommerce companies. It pulls in requests from email and/or a form on your website and also integrates with marketplaces like Amazon, eBay, and Etsy to pull in requests from those channels. The highlight of the platform is its integration with ecommerce CMSs like Shopify, Magento, and PrestaShop that allow you to bring order details directly into your help desk.
Price: Free for self hosting. Paid, cloud-hosted plans start at $8/agent per month with a minimum of two agents.
The best help desk CRM software
While help desk software and customer relationship management software are typically two different systems, there are a handful of platforms that provide both tools, allow you to access both systems from the same interface, and sync data between the two platforms.
The platforms below are great for customer success teams and professional services businesses where support and sales work closely together.
21. Salesforce – Best combined help desk and CRM for large businesses


Salesforce's CRM is its flagship product, but the company also has a help desk product called Agentforce Service that works hand in hand with the CRM. Data from both systems syncs to both platforms, and support teams can manage requests from any channel using the system. Many advanced AI features are also available, and they use Salesforce's proprietary Einstein Trust Layer to keep your data secure.
Price: Free plan available. Paid plans start at $25/user per month.
22. HubSpot – Best combined help desk and CRM for mid-sized businesses


HubSpot offers both CRM (Sales Hub) and help desk (Service Hub) products that are integrated and available to access from the same interface. It can require a bit of a learning curve to get started, but there is tons of self-service documentation available to learn the ropes. Once you've gotten the hang of things, it's an easy-to-use system that can be used to manage the entire customer lifecycle from lead to churn.
Price: Free plan available. Sales Hub and Service Hub plans are sold separately. Prices for each platform start at $15/seat per month (though at the time of writing this post, Starter plans are discounted for new customers to $9/seat per month).
Recommended Reading

23. Zoho – Best combined help desk and CRM for small businesses


Zoho offers a CRM (Zoho CRM), a help desk (Zoho Desk), and dozens of other platforms covering use cases for every possible department in a company. The big draw of Zoho is its large ecosystem of apps combined with its very inexpensive pricing. Zoho Desk can be used to manage requests from email, chat, social, and phone, and both the help desk and CRM have AI features that help teams do their work faster.
Price: Free plan available. Paid Zoho Desk plans start at $7/user per month. Paid Zoho CRM plans start at $14/user per month.
Recommended Reading

The best industry-specific help desk software
All of the platforms above are industry agnostic — they're built to work for teams in all different types of industries. However, some industries have very different business models or are required to adhere to more strict guidelines that might make the tools above a poor fit.
If you're looking for a help desk built specifically for the needs of your industry, here are a few industry-specific options to consider.
24. Incident IQ – Best help desk software for schools


IncidentIQ is built specifically for K-12 institutions. It's flexible enough to be used for a single school or across an entire school district. It comes with features for IT teams like deployment for assigning devices to students, a portal for students and staff to request help, and issue logs for all devices. Facilities teams can also use the platform's mobile apps to manage their requests for repairs and routine maintenance.
Price: Contact IncidentIQ for pricing.
Recommended Reading

25. Quore – Best hospitality help desk software

Quore is an operations hub for hotels. It can be used to manage bookings, organize housekeeping, track maintenance requests, and view reports. Front desk workers can use the platform to create tasks for housekeeping and maintenance teams when guests call in with requests, and housekeeping and maintenance can access their task list and mark items as complete using the platform's mobile app.
Price: Contact Quore for pricing.
26. Giva – Best HIPAA-compliant help desk software for healthcare


Giva is a HIPAA-compliant help desk built for healthcare companies that have agents providing phone support. Agents can create tickets in the system and route them to the appropriate team or facility. AI-powered copilots are available to help agents find knowledge quickly, there are modules for knowledge and asset management, and detailed reports are available for managers to view performance.
Price: Plans start at $69/agent per month for up to 10 agents.
Recommended Reading

27. CivicPlus – Best help desk software for government


CivicPlus offers lots of features for government officials and offices to communicate with their constituents and manage requests, including a mass texting system, a 311 request manager, and a public records request system. Other features include automatic routing to get requests to the right individuals, duplicate request detection, and two-way communication to ask follow-up questions and get replies as needed.
Price: Contact CivicPlus for pricing.
28. Jobber – Best help desk software for field services companies


Jobber is an all-in-one platform built for field services companies (plumbers, electricians, landscapers, etc.). Its help desk features include customer portals, two-way text messaging, and automated reminders, but it can be used for much more than just customer support. It also has marketing tools, invoicing, payment processing, online bookings, and an AI receptionist that will answer calls when you can't.
Price: Individual plans start at $29/month for one user. Team plans start at $129/month for up to five users.
29. Shopmonkey – Best help desk for auto shops and mechanics

Shopmonkey has features to help auto shops manage all of their operations. From the help desk side of things, you can communicate with customers via email or SMS, get digital approvals for estimates, and send automated reminders for appointments. Beyond that, there are tools for managing your inventory, collecting payments, and scheduling your jobs and techs using a Kanban board.
Price: Plans start at $179/month.
30. OperaDDS – Best help desk for dentist offices


OperaDDS helps dentist offices digitize their operations. Send paperwork to patients to fill out online before their appointments, send automated text and email reminders about appointments, and offer alternative times when patients need to reschedule. Communicate with patients securely (OperaDDS is HIPAA-compliant) via email when needed, and retract emails unintentionally sent to the wrong person.
Price: Contact OperaDDS for pricing.
31. Agentforce Manufacturing for Service – Best help desk for manufacturing companies

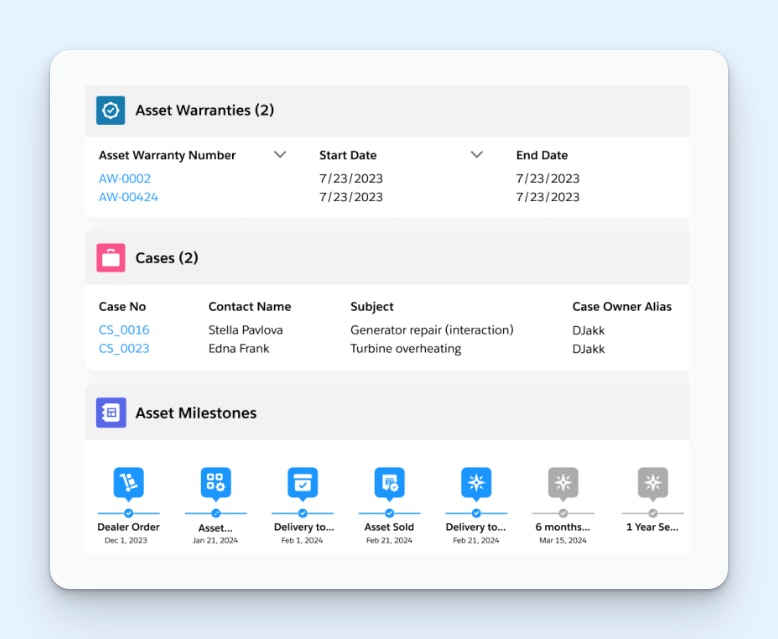
Agentforce Manufacturing for Service is Salesforce's support product built specifically for manufacturing teams. It comes with a service desk showing all customer interactions in a chronological timeline, lets you manage assets and orders, and has a feature you can use to define your warranty policies per product. Automation is also built into the platform for things like claim approvals and warranty extension purchases.
Price: Plans start at $275/user per month.
Choosing the right help desk software for your team
Before you start seriously shopping, make sure you know what you need and how much you can afford to spend. There are a lot of help desks on the market, so knowing exactly what features are non-negotiable and what your budget is gives you an easy way to knock contenders off of your short list.
Once you have a short list of tools to consider, test them by signing up for a free trial. Consider creating an evaluation team that consists of a junior-level team member, a couple of power users, and a manager or senior leader. This will allow you to test the tool thoroughly and get lots of different perspectives on what does and doesn't work for the team.
If going through those two steps doesn't get you to a clear winner, there are also a couple of tie-breaker steps you can take. First, reach out to the provider's customer service team to make sure you're going to get quality support when you need it. Second, consider getting some insights from people who currently use the tool. You can reach out to your network or read reviews on sites like G2 and TrustRadius.
If you need more guidance, check out our Buyer's Guide to Choosing the Right Customer Support Tool.
Jessica Greene
Jessica Greene is a Help Scout alum, where we make excellent customer service achievable for companies of all sizes. Connect with her on LinkedIn or through her website.


